

For many purpose we need to install the java on our System, It will help to give all snapshots together for installation. For more visit to official site click here

There may be many ways and each individuals their own directory and path style to install the java on your Linux System but, I am going through common point of view.
Step 0: Update your System (Package Index)
$ sudo apt-get update
$ sudo apt-get dist-upgrade
Step 1: Download the JDK (Java Development Kit) Click here
From this site you may download the JDK of your own choice suitable to your system configurations.
For me it’s jdk-7u3-linux-i586.tar.gz downloaded in Downloads folder.
Step 2: Extract the .gz file by following command
$ tar -xvf ~/Downloads/jdk-7u3-linux-i586.tar.gz
Above command will make a directory named ~/Downloads/jdk1.8.0_161/
Step 3: Made a directory named java in /usr/share/ folder
You may install your java to any directory as you wish but, for me it’s /usr/share/ folder and as I told you it’s common structure followed by Developers, use following command to make directory in usr/share/.
$ sudo mkdir /usr/share/java
Step 4: Move the jdk1.8.0_161 folder to /usr/share/java folder.
$ sudo mv ~/Downloads/jdk1.8.0_161/ /usr/share/java/
Step 5: Create the Symbolic link of each jdk package by command update-alternatives as follows
$ sudo update-alternatives --install /usr/bin/java java /usr/share/java/jdk1.8.0_161/bin/java 1
$ sudo update-alternatives --install /usr/bin/javac javac /usr/share/java/jdk1.8.0_161/bin/javac
$ sudo update-alternatives --install /usr/bin/jar jar /usr/share/java/jdk1.8.0_161/bin/jar 1
$ sudo update-alternatives --install /usr/bin/javaws javaws /usr/share/java/jdk1.8.0_161/bin/javaws 1
$ sudo update-alternatives --install /usr/bin/javadoc javadoc /usr/share/java/jdk1.8.0_161/bin/javadoc 1
Step 6: JAVA Environment variable Setup
Java environment variable can be set by two way
1 Local or user level privileges by Bash Shell ( .bashrc file of home directory) .
2 Global or root level privileges in profile script
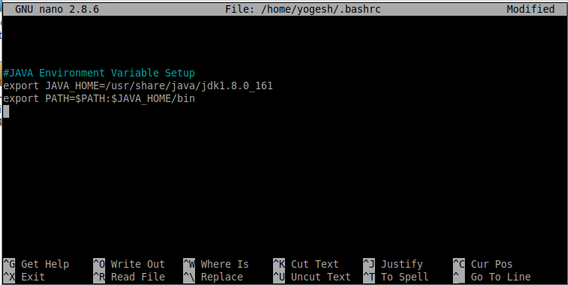
Step 6.1: Local Environment Variable Setup
$ nano ~/.bashrc
Add the following line to the bottom of script.
#JAVA Environment Variable Setup.
export JAVA_HOME=/usr/share/java/jdk1.8.0_161/
export JDK_HOME=/usr/share/java/jdk1.8.0_161/bin:$PATH
(OR)
#JAVA HOME directory setup
export JAVA_HOME=/usr/share/java/jdk1.8.0_161
export PATH=$PATH:$JAVA_HOME/bin
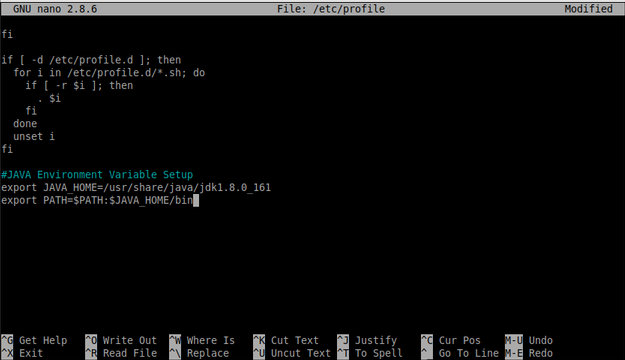
Step 6.2: Global Environment variable Setup
Global environment variable can be set to profile by following command.
$ sudo su
[sudo] password for user: ***
$ nano /etc/profile
Add the following line to the bottom of script.
#JAVA Environment Variable Setup.
export JAVA_HOME=/usr/share/java/jdk1.8.0_161
export PATH=$PATH:$JAVA_HOME/bin
Step 7: Test Your Installation
7.1 Open new terminal by Ctrl+Alt+T
7.2 java -version
Java version “1.8.0_171”
Java Runtime Environment (build 1.8.0_171–8u171-b11–0ubuntu0.17.10.1-b11)
Java 64-Bit Server VM (build 25.171-b11, mixed mode)
So, above steps will install the java on your system.
Note:- Sometimes when run java -version show error no such directory found /usr/share/…, This is because of some dependency of the 32 bit are missing.
then, hit following command..
$ sudo apt-get install libc6-i386
Open JDK Installation: Note Only for Linux
# Install Open Jdk.
$ sudo apt install openjdk-8-jre-headless

# Remove installed open jdk.
$ sudo apt-get remove openjdk-*
Thank You
Itís nearly impossible to find well-informed people for this topic, but you seem like you know what youíre talking about! Thanks
May I simply say what a comfort to discover somebody who genuinely knows what they are talking about over the internet. You actually understand how to bring a problem to light and make it important. More people ought to check this out and understand this side of the story. I cant believe you arent more popular because you surely possess the gift.
Hi there to all, how is the whole thing, I think every one is getting more from
this web site, and your views are nice in support of new users.